Birthday Outfits, Free Pattern and Giveaway
My daughter turned one on Feb 24. When I made her a Christmas dress
last year, I quite decided that I would start a tradition and make
her a dress for Christmas every year. Well I think I'm going to
extend that tradition and include birthdays as well.
Only time will prove if I can hold myself to it.
Anyway, I made Nikhita not one, but two outfits for her birthday.
Both made out of the same fabrics and similar patterns.

 The
The
bodice is made out of a cream cotton sateen (which is my latest
favourite fabric) and the top layer of flounce and the bloomers were
made with an English cotton. I actually started out with plans to
make only one dress but for 2 VERY compelling reasons, I decided to
make the other one too:
1. One metre of fabric goes a LONG way when making clothes for
tiny bodies.
2. A single bodice pattern for a child is SO adaptable and open
to versions upon versions. (also, no darts and limited shaping =
no fuss sewing).
This outfit
 comprises
a blouse, made from the same bodice pattern as Outfit One,
and flared pants, with elastic garters for a waistband. It
is embellished with an appliqued flower motif on the blouse
and a cream satin binding around the cuffs of the legs.
Prior to this attempt, I had never machine appliqued
anything before so the result is not great. I had only
pinned it to the garment before satin-stitching around the
motif. I think I really should have hand-tacked it down
instead to reduce the puckering around the applique.
Next time.
For now, here is another free pattern for download
(instructions not included):
last year, I quite decided that I would start a tradition and make
her a dress for Christmas every year. Well I think I'm going to
extend that tradition and include birthdays as well.
Only time will prove if I can hold myself to it.
Anyway, I made Nikhita not one, but two outfits for her birthday.
Both made out of the same fabrics and similar patterns.

 The
Thebodice is made out of a cream cotton sateen (which is my latest
favourite fabric) and the top layer of flounce and the bloomers were
made with an English cotton. I actually started out with plans to
make only one dress but for 2 VERY compelling reasons, I decided to
make the other one too:
1. One metre of fabric goes a LONG way when making clothes for
tiny bodies.
2. A single bodice pattern for a child is SO adaptable and open
to versions upon versions. (also, no darts and limited shaping =
no fuss sewing).
This outfit
 comprises
a blouse, made from the same bodice pattern as Outfit One,
and flared pants, with elastic garters for a waistband. It
is embellished with an appliqued flower motif on the blouse
and a cream satin binding around the cuffs of the legs.
Prior to this attempt, I had never machine appliqued
anything before so the result is not great. I had only
pinned it to the garment before satin-stitching around the
motif. I think I really should have hand-tacked it down
instead to reduce the puckering around the applique.
Next time.
For now, here is another free pattern for download
(instructions not included):
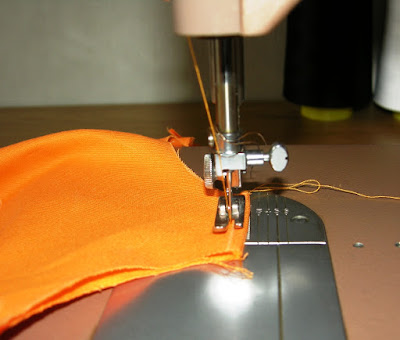
The pattern does NOT include a template nor
instructions for the flounce but it is very easy to
make. For the top layer, cut a rectangular strip of
cloth 8 cm wide and 115 cm long (which is roughly
twice the circumference of the bodice hem). If you
have a ruffler or a gathering foot, use them to make
gathers, stitching at about 1 cm from one edge. If
you don't have these feet, do what I did. As you
stitch with a regular foot, make small tucks with an
awl about 0.5 cm apart, each tuck being about 0.2 to
0.5 cm deep.
The second, under layer of flounce is 16 cm wide and
as long as the first layer.
Attach each layer separately to the bodice because
you will need to trim off the excess length and seam
up the ends of the flounce.
ers or pants pattern to
five lucky commentors, who will be randomly
picked. If you want to join, please comment on this
post, telling me about your latest/on-going sewing
or craft project. The winners will be announced on
Friday, April 24.
Yes, this is a
shameless attempt to promote my blog, but hey, a
freebie giveaway is still a freebie giveaway, eh?
Tutorial & Free Pattern - Girl's Panel Dress
This tutorial is for the girl's panel dress of the
I retrieved what photos I thought were useful,
even though I had changed the original design somewhat in the final
model. Hopefully, you'll be able to make sense of them and not be
too muddled if you should attempt to make up the pattern.
A few points to note before starting:
- French seams are used throughout.
- The instructions will make more sense if you have had a chance
to look at the paper pattern pieces.
- Gauging purely by my daughter's build, the pattern is good for
sizes from 6 months to 12 months. But please measure relevant
dimensions before cutting into expensive fabric and not having
it fit!
- Print the pattern at 100% on A4-sized paper.
- You will need acrobat reader to open the file.
Yardage:
Less than 1 metre in total. If you are using 3 different fabric,
then definitely less than half metre for each.
How to:
1. Transfer the pattern onto your fabric and add seam allowances
according to your preferred widths (I like 3/8" or 1cm). Cut out
all pieces. You will have 12 pieces in total.

2. Make up the back bodice first. Fold along the marked line to
create the button placket. Do this for both back pieces. Press.

First fold on the seam
allowance.

Second fold along the marked
foldline.
3. Stitch the folds down.

4. On the right side back piece, mark with a ruler the
buttonhole placements. Let the first buttonhole start about 5/8"
or 1.5cm down from the top edge.

5. Use your machine buttonhole setting to make the buttonholes.

6. With wrong sides (WS) together, attach the front bodice to
the back bodice pieces at the shoulder. To make a French seam,
sew at 3/16" (0.5cm) away from the seam line. Trim down to 2mm
from the stitchline. Press open.

7. Fold along the previous stitch line so that the right
sides(RS) are now facing each other. Sew along the marked seam
lines. Press towards the back.
Sew along the seam lines

Press towards back.
8. Select a decorative stitch (I chose scallops) and stitch all
along the seam lines around the neck and arm openings. This
being the point at which I deviated from the original plan, I do
not have pictures. But here are pictures from a different
project that employed scallop edging to explain the process.

9. Trim away the excess fabric.

10. Attach the skirt panels, four to a side, using French seams
(remember to start off with WS together first).


Remember to alternate the
pattern if you are using different fabrics.
Press to one side the finished
seams.
11. You will now have 2 skirt pieces, one for the front and one
for the back. They are identical.

12. Pin the 2 pieces of the back bodice together. The button
plackets must fully overlap each other.

13. Attach the bodice to the skirt using the French seam. With
WS together, pin the back bodice to one of the skirt pieces (the
narrower end is up), and stitch down 3/16" (0.5cm) away from the
seam line. Trim and press open.


14. Fold along the previous stitch line so that the right
sides(RS) are now facing each other. Sew along the marked seam
lines. Press down towards the skirt.
15. To prevent the French seam from standing up, stitch down
about 1-2mm from the edge on the RS.

16. Repeat steps 13 - 15 for the front bodice and skirt piece.
(There will now be a disgraceful lack of pictures. Sorry).
17. You will now have front and back dress pieces. Attach the
front and back along one of the sides using the French seam
method (basically steps 13 and 14, with 15 being optional).
Press the side seam towards the back.
18. You now have an almost-dress with one side seam attached and
one still open.
19. Take the skirt hem and pin it (WS together) to the bottom of
the skirt from open seam to open seam. Attach using the French
seam method (steps 13 and 14).

20. Press up towards the main skirt and stitch down on the RS.

21. Sew up the second side seam to completely attach the front
and back dress pieces (with French seams again, of course).
Press seam towards the back.
22. Using the same decorative stitch as before, sew all along
the bottom edge of the skirt hem. Trim away excess as before.
23. Mark out button placements and hand-sew them on.
This tutorial is for the girl's panel dress of the
I retrieved what photos I thought were useful,
even though I had changed the original design somewhat in the final
model. Hopefully, you'll be able to make sense of them and not be
too muddled if you should attempt to make up the pattern.
A few points to note before starting:
- French seams are used throughout.
- The instructions will make more sense if you have had a chance
to look at the paper pattern pieces.
- Gauging purely by my daughter's build, the pattern is good for
sizes from 6 months to 12 months. But please measure relevant
dimensions before cutting into expensive fabric and not having
it fit!
- Print the pattern at 100% on A4-sized paper.
- You will need acrobat reader to open the file.
Yardage:
Less than 1 metre in total. If you are using 3 different fabric,
then definitely less than half metre for each.
How to:
1. Transfer the pattern onto your fabric and add seam allowances
according to your preferred widths (I like 3/8" or 1cm). Cut out
all pieces. You will have 12 pieces in total.

2. Make up the back bodice first. Fold along the marked line to
create the button placket. Do this for both back pieces. Press.

First fold on the seam
allowance.

Second fold along the marked
foldline.
3. Stitch the folds down.

4. On the right side back piece, mark with a ruler the
buttonhole placements. Let the first buttonhole start about 5/8"
or 1.5cm down from the top edge.

5. Use your machine buttonhole setting to make the buttonholes.

6. With wrong sides (WS) together, attach the front bodice to
the back bodice pieces at the shoulder. To make a French seam,
sew at 3/16" (0.5cm) away from the seam line. Trim down to 2mm
from the stitchline. Press open.

7. Fold along the previous stitch line so that the right
sides(RS) are now facing each other. Sew along the marked seam
lines. Press towards the back.

Sew along the seam lines

Press towards back.
8. Select a decorative stitch (I chose scallops) and stitch all
along the seam lines around the neck and arm openings. This
being the point at which I deviated from the original plan, I do
not have pictures. But here are pictures from a different
project that employed scallop edging to explain the process.

9. Trim away the excess fabric.

10. Attach the skirt panels, four to a side, using French seams
(remember to start off with WS together first).


Remember to alternate the
pattern if you are using different fabrics.
Press to one side the finished
seams.
11. You will now have 2 skirt pieces, one for the front and one
for the back. They are identical.

12. Pin the 2 pieces of the back bodice together. The button
plackets must fully overlap each other.

13. Attach the bodice to the skirt using the French seam. With
WS together, pin the back bodice to one of the skirt pieces (the
narrower end is up), and stitch down 3/16" (0.5cm) away from the
seam line. Trim and press open.


14. Fold along the previous stitch line so that the right
sides(RS) are now facing each other. Sew along the marked seam
lines. Press down towards the skirt.
15. To prevent the French seam from standing up, stitch down
about 1-2mm from the edge on the RS.

16. Repeat steps 13 - 15 for the front bodice and skirt piece.
(There will now be a disgraceful lack of pictures. Sorry).
17. You will now have front and back dress pieces. Attach the
front and back along one of the sides using the French seam
method (basically steps 13 and 14, with 15 being optional).
Press the side seam towards the back.
18. You now have an almost-dress with one side seam attached and
one still open.
19. Take the skirt hem and pin it (WS together) to the bottom of
the skirt from open seam to open seam. Attach using the French
seam method (steps 13 and 14).

20. Press up towards the main skirt and stitch down on the RS.

21. Sew up the second side seam to completely attach the front
and back dress pieces (with French seams again, of course).
Press seam towards the back.
22. Using the same decorative stitch as before, sew all along
the bottom edge of the skirt hem. Trim away excess as before.
23. Mark out button placements and hand-sew them on.
24. Hopefully, you have been testing for fit at strategic
points during the construction and the dress fits your
daughter/niece/granddaughter wonderfully. If so, you are
done.
I sincerely hope the pattern works well for you. If you
do try this out, I'd love to hear your thoughts and see
pictures of your finished dress :)
I apologize in advance for any mistakes or oversights in
the instructions.
Christmas Clothes
Well Christmas (2008) has come and gone, it is already April '09 and
I really should update on what I'd done with the fabric mentioned in
First off, for the kid, I chose this set of coordinates

and made this dress (which is a Mark II)


front back
During the process of making it, I had actually taken quite detailed
photos with the intention of writing a tutorial, complete with a
free pattern and everything.
HOWEVER...
the outcome (Mark I) needed so many modifications that the photos
are quite useless after the fact. Anyway, I will still post the free
pattern once I figure out how to convert it to a pdf, and how to get
it hosted somewhere.
The neckline, armholes and hem (of Mark II) were all finished with a
decorative scallop-stitch instead of the usual facings and hemming.
Of course, this was because I made a mess of the original design,
which had bias binding around the neck and armholes. The openings
were too small, alas, and so I cut the bindings away to make larger
openings. The rest of the dress was finished at this point, and I
had no desire to unpick anything to add facings and thus, the
decorative edging came into being. Why didn't I just re-attach the
binding? I thought the original made the dress look rubbish. So in
hindsight, the mistake was fortuitous after all. Bah.

This was how it looked like with binding, before testing it on the
child, dang it!

What do you think?
Next up, is the shirt for the hubby.
Should have taken a photo of him
wearing it but decided that nothing can make a picture of a
man's shirt exciting so here it is in all its boring-ness.

The only thing I want to talk about this shirt is that I had to
squeeze every last centimetre of fabric out of the yardage to make
this, which explains the colour of the inner yoke, obviously made
out of plain black cotton. And because Henry just HAD to have a
pocket, I pieced together scraps (I mean inch-wide bits of scrap) to
make one.

If you click on this picture, you will be able to see where the
flower pattern on the pocket doesn't match. But hey, he got his
pocket.
And finally, my dress.


Made out of the faux marimekko print (yellow poppies, yay!) with a
high waistband in a contrasting fabric.
I pondered whether to add that or not but decided that it would
break the monotony of the poppies print. I'm glad I did but wish I
had paid more attention to the pattern placement of the accent
fabric.
in the 5 days before Christmas -
5 days before making a 3-baggage, 4-hour car ride to Singapore for
Christmas - I can pat myself on the back and not sweat the boo-boos
too much :)


No comments:
Post a Comment