Fabics
It was while on a playdate at our cousin's place this Sunday past. She (my
cousin-in-law) hauled out 2 hypermarket-sized plastic bags of fabric, given
to her by her MIL who had been collecting the stash since the 70's.
The last time I was in Singapore, I stocked up on
more fabric, naturally,
from my favourite store,
Spotlight.


I want to make Nikhita a dress from either one of these 2
coordinated sets. I firmly advocate that children should be
dressed as colourfully as is decent and tasteful (because it is
very difficult to get away with these combinations without
serious questioning of one's state of mind as an adult).
My best buddy of Raheel Khaliq
had introduced me to
Hanna Andersson children's clothing last year, when she sent
me a couple of their catalogues. It was love at first sight! I
picked out 2 contenders for patterns that the fabric choices
will suit:


The one on the right will suit very nicely but I'm not a big fan
of flounce...I will just KIV for the future. I think I will go
with the left one, with some modifications.

I also have these for the babe but have not quite made up my
mind yet what they will become. Although I do think some new
jammies might develop from the fabric 2nd from the top. The 3rd
one down is purple corduroy, which will probably end up being a
jacket and a skirt or/and pants.
And sadly, I've absolutely NO IDEA what to make for myself. The
black and white number will become a blouse cos there's only so
much material. The other 2, sundresses of some sort, but as yet,
no actual image of anything in my head. Maroon Kebaya Story Part 1 - Pattern placement
 the sarong
The Plum Ensemble Story Part 1 - Sewing with Microfibre
A friend of mine wanted me to help her with one of her outfits
for her upcoming wedding. She had bought a dress but needed a
few items made to go with it.

Since it would be a traditional Malay wedding, modesty and
discretion are called for. One of the items needed is a
headscarf (or a 'tudung'). I found a deep plum fabric in a
microfibre weave called peachskin, which was satiny smooth with
a medium hand. Perfect!
(totally off colour on camera)

Microfibre fabrics require some special attention. Use a
microtex needle size 60/8 H-M in your machine and sew with a
stitch length of 2mm - 1.5mm (very fine!). The fabric tends to
pucker with sewing so for straight-stitching, it would be
preferable to use a straight-stitch foot with a straight-stitch
needle plate, although not essential. Because I was going to
edge it in an embroidery stitch, I used a multi-purpose foot
with a multi-purpose plate and had no problems. I also found
that it really helped to reduce the puckering if I kept the
fabric taught under the foot.
To make the headscarf, I trimmed 1.5 metres of fabric into a
square of roughly 114cm side. I considered narrow-hemming the
raw edges but the fabric does not take a crease well so I
decided on scallop-stitching the edges instead.
 While
While
doing that, I had to pull the fabric away from me as I sewed, or
else the fabric would bunch up under the needle.
The excess fabric outside of the scallops was trimmed away,
revealing a nice scalloped edge.

The headscarf completed.

It was while on a playdate at our cousin's place this Sunday past. She (my
cousin-in-law) hauled out 2 hypermarket-sized plastic bags of fabric, given
to her by her MIL who had been collecting the stash since the 70's.
Needless to stay, we had an inspiring and gleeful time digging into the
bags. There were also many disrespectful moments when we looked at a
piece of fabric and cringed...either at the gaudiness or the very
polyester feel :P
But there were MANY pieces in there that ended up in the 'lots of
potential' pile. So it looks like there will be PLENTY of garment sewing
in my near future.
This is what I took home for myself:

Lovely cottons
And then there is this pile of vintage polyester fabric which I also
took, with some reservation but thinking that I could have some use for
them:

Dubious about these
synthetics
Have not really thought about what I'd make...I'm just enjoying looking
at them (the cottons mostly!) for now :)
Hurray for FREE FABRIC!
I'm Officially 'On Leave'...Woohoo!!
Today marks the start of my 2 week break from sewing...work
related ones, of course! I fully intend to spend the first week
sewing for myself at last (which basically only means sewing for
fun, because my sewing
plans for the week includes things for the babe and the
hubby...and maybe a Christmas present or two).
The last time I was in Singapore, I stocked up on
more fabric, naturally,
from my favourite store,
Spotlight.


I want to make Nikhita a dress from either one of these 2
coordinated sets. I firmly advocate that children should be
dressed as colourfully as is decent and tasteful (because it is
very difficult to get away with these combinations without
serious questioning of one's state of mind as an adult).
My best buddy of Raheel Khaliq
had introduced me to
Hanna Andersson children's clothing last year, when she sent
me a couple of their catalogues. It was love at first sight! I
picked out 2 contenders for patterns that the fabric choices
will suit:


The one on the right will suit very nicely but I'm not a big fan
of flounce...I will just KIV for the future. I think I will go
with the left one, with some modifications.

I also have these for the babe but have not quite made up my
mind yet what they will become. Although I do think some new
jammies might develop from the fabric 2nd from the top. The 3rd
one down is purple corduroy, which will probably end up being a
jacket and a skirt or/and pants.
Henry the husband will get a shirt. He's been resolutely on a
campaign to lose weight and get fit and I must say he is looking
better than I've ever seen him!

Fabric for his shirts
Yes, I know they are floral, but it is my belief that REAL men
wear flower prints (and pink, for that matter). I will probably
make up the one in blue first and save the other one for Chinese
New Year 2009.
No picture of a shirt design to show you but do you really need
to see a picture of a short-sleeved shirt?
And so we come to fabric meant
for me!

And sadly, I've absolutely NO IDEA what to make for myself. The
black and white number will become a blouse cos there's only so
much material. The other 2, sundresses of some sort, but as yet,
no actual image of anything in my head.
It HAS been a while, I know! With orders piling up, a home
visit, and Christmas around the corner, I barely had to time to
sleep...
visit, and Christmas around the corner, I barely had to time to
sleep...
Things are
still crazy here but I was determined to make this post,
and so here it is!
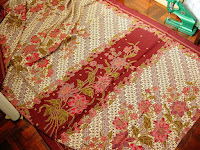
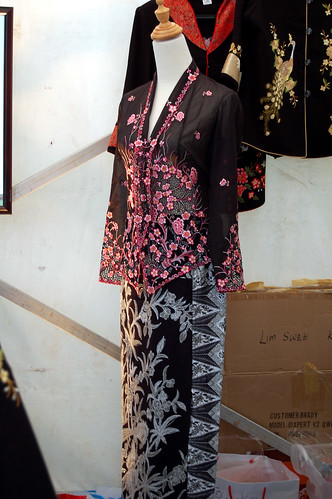
One of the many traditional garbs over here in Malaysia is the
sarong kebaya. It is a
2-piece ensemble of a close-fitting embroidered blouse (the
kebaya) worn over a batik sarong. There are basicially 3
versions or styles - Malaysian, Indonesian and Peranakan,
differing mostly in the length and embroidery design of the
kebaya, and the print of the batik of the sarong.

Peranakan style
sarong kebaya
My nice Japanese client came to me with
pre-embroidered kebaya and sarong cloths. The style of the
kebaya cloth was more Malaysian (much longer blouse) than
Peranakan, although the print on the sarong was more Peranakan
(more flowers less geometric patterns). Well!


embroidery
detail for the front 'piece'
(click for
larger)
still crazy here but I was determined to make this post,
and so here it is!
One of the many traditional garbs over here in Malaysia is the
sarong kebaya. It is a
2-piece ensemble of a close-fitting embroidered blouse (the
kebaya) worn over a batik sarong. There are basicially 3
versions or styles - Malaysian, Indonesian and Peranakan,
differing mostly in the length and embroidery design of the
kebaya, and the print of the batik of the sarong.
Peranakan style
sarong kebaya
My nice Japanese client came to me with
pre-embroidered kebaya and sarong cloths. The style of the
kebaya cloth was more Malaysian (much longer blouse) than
Peranakan, although the print on the sarong was more Peranakan
(more flowers less geometric patterns). Well!


embroidery
detail for the front 'piece'
(click for
larger)


(click for
larger)
larger)
Being rather petite, she wanted the kebaya rather shorter than
the embroidery intended it to be, which would result in the bulk
of the embroidery (the triangular section) to rise significantly
above her waistline, when it should at least stop there. I
advised her against this as it would not be a flattering look on
her petite frame. So she agreed to have the apex of the
embroidery begin at the waistline.

Pattern marked out on right side for accuracy. That
piece of loose embroidery on the right side of the
picture is the neck/collar piece
(click for
larger)
larger)
And because of her petite-ness, about a third of the embroidered
piece was potentially going to be wasted. This would also have
the added undesirable consequence that the front embroidery
would not coincide nicely with the narrower back embroidery
detail (you can see the back piece just to the left and bottom
of the picture). In order to avoid all of that, I un-attached
the embroidery at that part and cut the pattern on the fabric
underneath instead, thus saving the whole piece to be reattached
to the back pattern piece after the blouse is made up.

(click for
larger)
That was the main headache solved for the blouse.
The sarong provided its own unique considerations also. Plus the
fact that my nice Japanese lady did not want a traditional
pleated sarong-styled skirt (with zipper instead of actually
wrapped and tied, the way most modern sarongs are worn these
days) but a fitted gored skirt with godets...
...which called for very strategic placement of pattern pieces
in order to get the most out of the prints on the fabric
and ensure a flattering
arrangement of the prints.


front
(click for
larger)
back
The triangular inserts are the godet pieces, 6 in total. The
front side pieces are so narrow in order to accomodate the broad
centre front piece. I did not want to cut into the print and
'spoil' it. The picture for the back was photographed with the
front side pieces in order to see the transition from front to
back.
The godets were attached first of all, to its right side
neighbours,

section.
In an ideal world, I would have liked to match the prints on
each piece as well but there really wasn't enough fabric for
that (nor enough patience on my part probably!) . I settled for
matching the tiny border pattern instead, you know, to earn my
fee :P

(click for
larger)
front side pieces are so narrow in order to accomodate the broad
centre front piece. I did not want to cut into the print and
'spoil' it. The picture for the back was photographed with the
front side pieces in order to see the transition from front to
back.
The godets were attached first of all, to its right side
neighbours,

(click for
larger)
which I then treated as one piece when attaching to the nextlarger)
section.
In an ideal world, I would have liked to match the prints on
each piece as well but there really wasn't enough fabric for
that (nor enough patience on my part probably!) . I settled for
matching the tiny border pattern instead, you know, to earn my
fee :P

(click for
larger)
A friend of mine wanted me to help her with one of her outfits
for her upcoming wedding. She had bought a dress but needed a
few items made to go with it.

Since it would be a traditional Malay wedding, modesty and
discretion are called for. One of the items needed is a
headscarf (or a 'tudung'). I found a deep plum fabric in a
microfibre weave called peachskin, which was satiny smooth with
a medium hand. Perfect!
(totally off colour on camera)

Microfibre fabrics require some special attention. Use a
microtex needle size 60/8 H-M in your machine and sew with a
stitch length of 2mm - 1.5mm (very fine!). The fabric tends to
pucker with sewing so for straight-stitching, it would be
preferable to use a straight-stitch foot with a straight-stitch
needle plate, although not essential. Because I was going to
edge it in an embroidery stitch, I used a multi-purpose foot
with a multi-purpose plate and had no problems. I also found
that it really helped to reduce the puckering if I kept the
fabric taught under the foot.
To make the headscarf, I trimmed 1.5 metres of fabric into a
square of roughly 114cm side. I considered narrow-hemming the
raw edges but the fabric does not take a crease well so I
decided on scallop-stitching the edges instead.
 While
Whiledoing that, I had to pull the fabric away from me as I sewed, or
else the fabric would bunch up under the needle.
The excess fabric outside of the scallops was trimmed away,
revealing a nice scalloped edge.

The headscarf completed.


No comments:
Post a Comment