The Plum Ensemble Story Part 1 - Sewing with Microfibre
A friend of mine wanted me to help her with one of her outfits for her
upcoming wedding. She had bought a dress but needed a few items made to
go with it.

Since it would be a traditional Malay wedding, modesty and discretion
are called for. One of the items needed is a headscarf (or a 'tudung').
I found a deep plum fabric in a microfibre weave called peachskin, which
was satiny smooth with a medium hand. Perfect!
(totally off colour on camera)
 Microfibre fabrics require some special attention. Use a microtex needle
size 60/8 H-M in your machine and sew with a stitch length of 2mm -
1.5mm (very fine!). The fabric tends to pucker with sewing so for
straight-stitching, it would be preferable to use a straight-stitch foot
with a straight-stitch needle plate, although not essential. Because I
was going to edge it in an embroidery stitch, I used a multi-purpose
foot with a multi-purpose plate and had no problems. I also found that
it really helped to reduce the puckering if I kept the fabric taught
under the foot.
To make the headscarf, I trimmed 1.5 metres of fabric into a square of
roughly 114cm side. I considered narrow-hemming the raw edges but the
fabric does not take a crease well so I decided on scallop-stitching the
edges instead.
 While
Whiledoing that, I had to pull the fabric away from me as I sewed, or else
the fabric would bunch up under the needle.
The excess fabric outside of the scallops was trimmed away, revealing a
nice scalloped edge.
 The headscarf completed.
Before starting on any sewing project with
'special' fabrics, I always consult Sandra Betzina's
It has a large index of fabric how-to and is, in my
opinion, an invaluable resource for any sewing enthusiast.
The Plum Ensemble Story Part 2 - Embellishing with 'Hot Fix'
Read Part 1:
Read Part 1:
The design of the dress is rather fairytale-like, with a princess cut
bodice, fluttery sleeves in chiffon and a ruched skirt. It has an under
layer of plum satin, overlaid with lilac chiffon. However, it lacked any
other embellishments, which would have made it really eye-catching, as
befits a wedding dress after all.
 So Su decided that she wanted to have some bling added to the sleeves
and front of the skirt. We went to a little store in a little alley
(just off Jalan Tunku Abdul Rahman) where a little Korean lady was
selling iron-on rhinestone crystals called Hot Fix. We spent a good hour
there browsing the hundreds of available designs and eventually settled
on a twirly motif for the sleeves and flower motifs for the skirt.
To apply the Hot Fix, remove the white backing to reveal the glue side
of the crystals. The crystals themselves are stuck on the clear plastic
(which is really a stiff adhesive tape) shiny side down. Position the
clear plastic tape with the crystal on the fabric and hand press to make
it stick. Once you are happy with the position, get ready your iron.

My iron comes with a detachable plate to protect the fabric, so I set it
to the highest steam setting. If you do not have a protective plate, I
suggest you still set it to the highest setting and use a natural fibre
pressing cloth. Turn the fabric over to the wrong side so that the
arrangement is now fabric, crystal, then plastic. Place the pressing
cloth over the fabric and press down with the iron. Leave it on for
about 10 - 15 seconds. Make sure all sections of the tape gets this same
10 - 15 second pressing or else some of the crystals will not stick
securely to the fabric.
I placed a teflon mesh between my iron and the fabric to stop the glue
backing the crystals from sticking to my iron plate. The pressing cloth
will protect against this too.

Let it cool. Then turn over to the right side and slowly peel off the
plastic tape. If you've done it right, the crystals will easily detach
from the tape because they are securely stuck to the fabric. I also find
that the steam from the iron helps the crystals to detach more easily as
well.
Front and back of sleeve 'before'


The sleeve 'after'


This is the flower motif chosen for the front

The skirt front 'before' and 'after'


The dress 'after'

Rhinestone crystals are
readily available loose with/without glue backing.'Hot Fix'
apparently is a Korean product, where the crystals are placed on
the sticky tape in a pre-designed motif. So its application is
easy and fuss-free.
This is the only online listing of a hot fix motif supplier I
could find. Everyone else seems to be offering loose stones:
bodice, fluttery sleeves in chiffon and a ruched skirt. It has an under
layer of plum satin, overlaid with lilac chiffon. However, it lacked any
other embellishments, which would have made it really eye-catching, as
befits a wedding dress after all.
The dress 'before'

and front of the skirt. We went to a little store in a little alley
(just off Jalan Tunku Abdul Rahman) where a little Korean lady was
selling iron-on rhinestone crystals called Hot Fix. We spent a good hour
there browsing the hundreds of available designs and eventually settled
on a twirly motif for the sleeves and flower motifs for the skirt.
To apply the Hot Fix, remove the white backing to reveal the glue side
of the crystals. The crystals themselves are stuck on the clear plastic
(which is really a stiff adhesive tape) shiny side down. Position the
clear plastic tape with the crystal on the fabric and hand press to make
it stick. Once you are happy with the position, get ready your iron.

My iron comes with a detachable plate to protect the fabric, so I set it
to the highest steam setting. If you do not have a protective plate, I
suggest you still set it to the highest setting and use a natural fibre
pressing cloth. Turn the fabric over to the wrong side so that the
arrangement is now fabric, crystal, then plastic. Place the pressing
cloth over the fabric and press down with the iron. Leave it on for
about 10 - 15 seconds. Make sure all sections of the tape gets this same
10 - 15 second pressing or else some of the crystals will not stick
securely to the fabric.
I placed a teflon mesh between my iron and the fabric to stop the glue
backing the crystals from sticking to my iron plate. The pressing cloth
will protect against this too.

Let it cool. Then turn over to the right side and slowly peel off the
plastic tape. If you've done it right, the crystals will easily detach
from the tape because they are securely stuck to the fabric. I also find
that the steam from the iron helps the crystals to detach more easily as
well.
Front and back of sleeve 'before'


The sleeve 'after'


This is the flower motif chosen for the front

The skirt front 'before' and 'after'


The dress 'after'

Rhinestone crystals are
readily available loose with/without glue backing.'Hot Fix'
apparently is a Korean product, where the crystals are placed on
the sticky tape in a pre-designed motif. So its application is
easy and fuss-free.
This is the only online listing of a hot fix motif supplier I
could find. Everyone else seems to be offering loose stones:
Plum Ensemble Story Part 3A - Making the Veil
The final item to be made for the ensemble is the wedding veil. I
found an embroidered lilac tulle sold by the metre and was lucky
enough to get the last metre left on the bolt. It has border
embroidery all along the selvedges and a repeated flower pattern on
the body.
I folded the fabric into 2 width-wise and cut a curved shape out on
one side in order to get the 'D' shape for the veil.

I wanted to use the border embroidery to hide the cut edges, so I
trimmed it off from the cut piece. I also cut out the flower motifs from
the piece because I thought I might need them.

The border was then hand-stitched onto the cut edge of the tulle. You
can see from the next picture that I divided the saved border into 2 and
attached one to either side of the veil, but obviously not long enough
to cover the entire cut edge.

This is where the salvaged flower motifs came in handy!
 I
Iused them to cover the rest of the cut edges.
 Trimmed
and pinned
 Attached
 Transition
from border design to flower motif
 The
Theveil with all appliques attached.
The flowers in the middle portion had to be spaced out because there
wasn't enough of the cut out flower pieces.
 I
Iintend to fill the spaces with a line of sequins and beads...
 ...so
...sowatch this space for Part 3B!
It is finished!
To continue where I left off, I added a row of beads to the scalloped
edging like so...

These were applied using a loop of 6 beads, then sewn down to the veil
at the midpoint of the loop (3 on either side).

For the edge with the flower motifs, I did not want to do the same
treatment because it made it look very bulky (and quite ugly I thought).
So I just added single beads spaced about 3 mm apart from each other.
This gives it a more delicate appearance while still providing some
glam.

And here's the transition at the two edges

And that empty space in the between the flowers which looked like this
before

now looks like this

Basically the original sequins saved from unusable cut out motifs were
stoppered with single beads.
I wish I could show what the overall effect looks like when worn over
the head (quite lovely if I do say so myself :]) but sadly, I have
neither a proper mannequin head nor suitably willing live models in my
house!
Hopefully I will be able to get proper pics from the bride herself when
she comes to collect next week (assuming she likes what I've done with
it :P)!
Maroon Kebaya Story Part 1 - Pattern placement
It HAS been a while, I know! With orders piling up, a home visit, and
Christmas around the corner, I barely had to time to sleep...
Things are still
crazy here but I was determined to make this post, and so here it is!
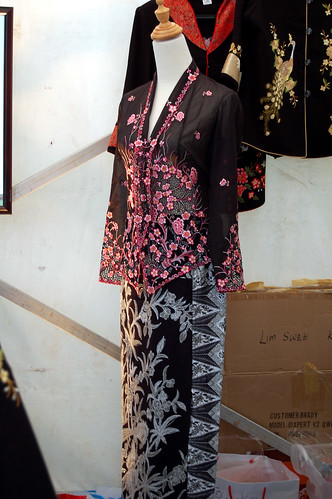
One of the many traditional garbs over here in Malaysia is the
sarong kebaya. It is a 2-piece
ensemble of a close-fitting embroidered blouse (the kebaya) worn over a
batik sarong. There are basicially 3 versions or styles - Malaysian,
Indonesian and Peranakan, differing mostly in the length and embroidery
design of the kebaya, and the print of the batik of the sarong.

Peranakan style sarong
kebaya
My nice Japanese client came to me with pre-embroidered
kebaya and sarong cloths. The style of the kebaya cloth was more
Malaysian (much longer blouse) than Peranakan, although the print on the
sarong was more Peranakan (more flowers less geometric patterns). Well!


embroidery detail for
the front 'piece'
(click for larger)
A Corset for a Wedding It HAS been a while, I know! With orders piling up, a home visit, and
Christmas around the corner, I barely had to time to sleep...
Things are still
crazy here but I was determined to make this post, and so here it is!
One of the many traditional garbs over here in Malaysia is the
sarong kebaya. It is a 2-piece
ensemble of a close-fitting embroidered blouse (the kebaya) worn over a
batik sarong. There are basicially 3 versions or styles - Malaysian,
Indonesian and Peranakan, differing mostly in the length and embroidery
design of the kebaya, and the print of the batik of the sarong.
Peranakan style sarong
kebaya
My nice Japanese client came to me with pre-embroidered
kebaya and sarong cloths. The style of the kebaya cloth was more
Malaysian (much longer blouse) than Peranakan, although the print on the
sarong was more Peranakan (more flowers less geometric patterns). Well!


embroidery detail for
the front 'piece'
(click for larger)
Despite the fact that my online business is
only about corsets, I have yet
to post anything about corsetry here. That is mostly because I only
offer a very few styles and really, who wants to see the same things
(albeit in different colours, etc) over and over again?
This particular corset had very
specific needs to address though. The dress it is to be worn under has a
very low back, all of 2 inches from the waist up! We tossed about the
preference of a waist cincher instead but my client really wanted
underbust support as well. I was skeptical at first of how much
underbust support could be gotten with such a minimal to zero back
support but drafted a pattern I thought might work anyway.

With a gentle curve from centre front to side, then back, it should
prevent the top front from flapping forwards, yet afford adequate
underbust support at the same time.
With the design approved by the client, I made it up in a delustered
white satin, and flossed it with silver embroidery thread.


I added the blue
highlight so that the bride might have a discreet 'something blue' as
well.
Fortunately, the design worked well (on my very forgiving mannequin in
any case).
Hopefully, it fits on the intended body perfectly too.
Maroon Kebaya Story Part 2 - Fit
The next challenge was the fit, of course. I had fitted a mock-up on my
client earlier but you never truly know until the actual garment itself
is on a body.
And it turned out that a lot more
fine-tuning was required, especially on the kebaya, now that it was
longer than originally planned.


The sleeves needed to be narrower and the shoulder length shortened. My
client's upper torso was rather concave as well, which necessitated a
shorter width across the upper bodice. Overall, it had to be taken in
a lot...as you can see from the
pictures!

The skirt was a better fit but we both agreed that it would look so much
better if it was just a tad narrower from the hips to the knees.
When I finished with the alterations, it certainly looked a thousand
times better. Sadly, I did not have a chance to get any pictures of her
in it...here is what it looks like on my mannequin (which is too big for
it!)


The front is supposed to meet, of
course
and does on the client

You can' really see the fit of the
skirt because it's only pinned on, unfortunately.

Lace detail on the front 'lapel'

Closer view of the back

The under-layer of fabric is cut away
for the full effect of the lace to be seen.
The front lace panel was also
re-attached to the back piece. I'm rather pleased with how that turned
out!

Overall, this was quite an enjoyable project from start to finish :


No comments:
Post a Comment